How to make Chocolate - Bean to Bar

Chocolate from bean to bar
Alright let’s go from cacao pod to chocolate bar today on this super-intensive video.
I am not going to lie, although this was a lot of fun, it was also a lot of hard work.
In total, this process took me over 2 months, not because the process takes this long, but because I messed up a few times had to start over, as well as deal with some week-long camera issues that didn’t allow me to film. However in my folly, I learned a lot, and I hope to pass what I learned on so you don’t make the same pitfalls I did.
Chocolate making is a very complicated and intricate process, but today, I am going to show you my simplistic attempt at making chocolate, however, even with my plebian attempt at chocolate, it still turned out really well.
If you would like to source your own cacao pods and try your hand at this recipe, please use my referral link to Miami Fruit - the small business where I was able to get some beautiful pods!
So with that let’s begin.
Chocolate making has more or less 4 steps:
Fermentation
Drying and roasting
Grinding
Heating and forming
Step 1 - Preparation and Fermentation
Alright, let’s start with the actual cocoa pods. These are them, they grow in deep tropical regions, originating from Mesoamerica, however, I sourced mine from a fruit company that specializes in exotic fruit. For those keeping track at home, I am pretty sure these are the Trinitario cultivar of cacao, however, any kind will work for this recipe.
So the first thing we want to do is split open the pods, very carefully using a knife we can cut it open to expose the interior. I know, it looks a lil crazy inside.
As you can see the cacao pod is surrounded by a shell, inside are the cacao beans.
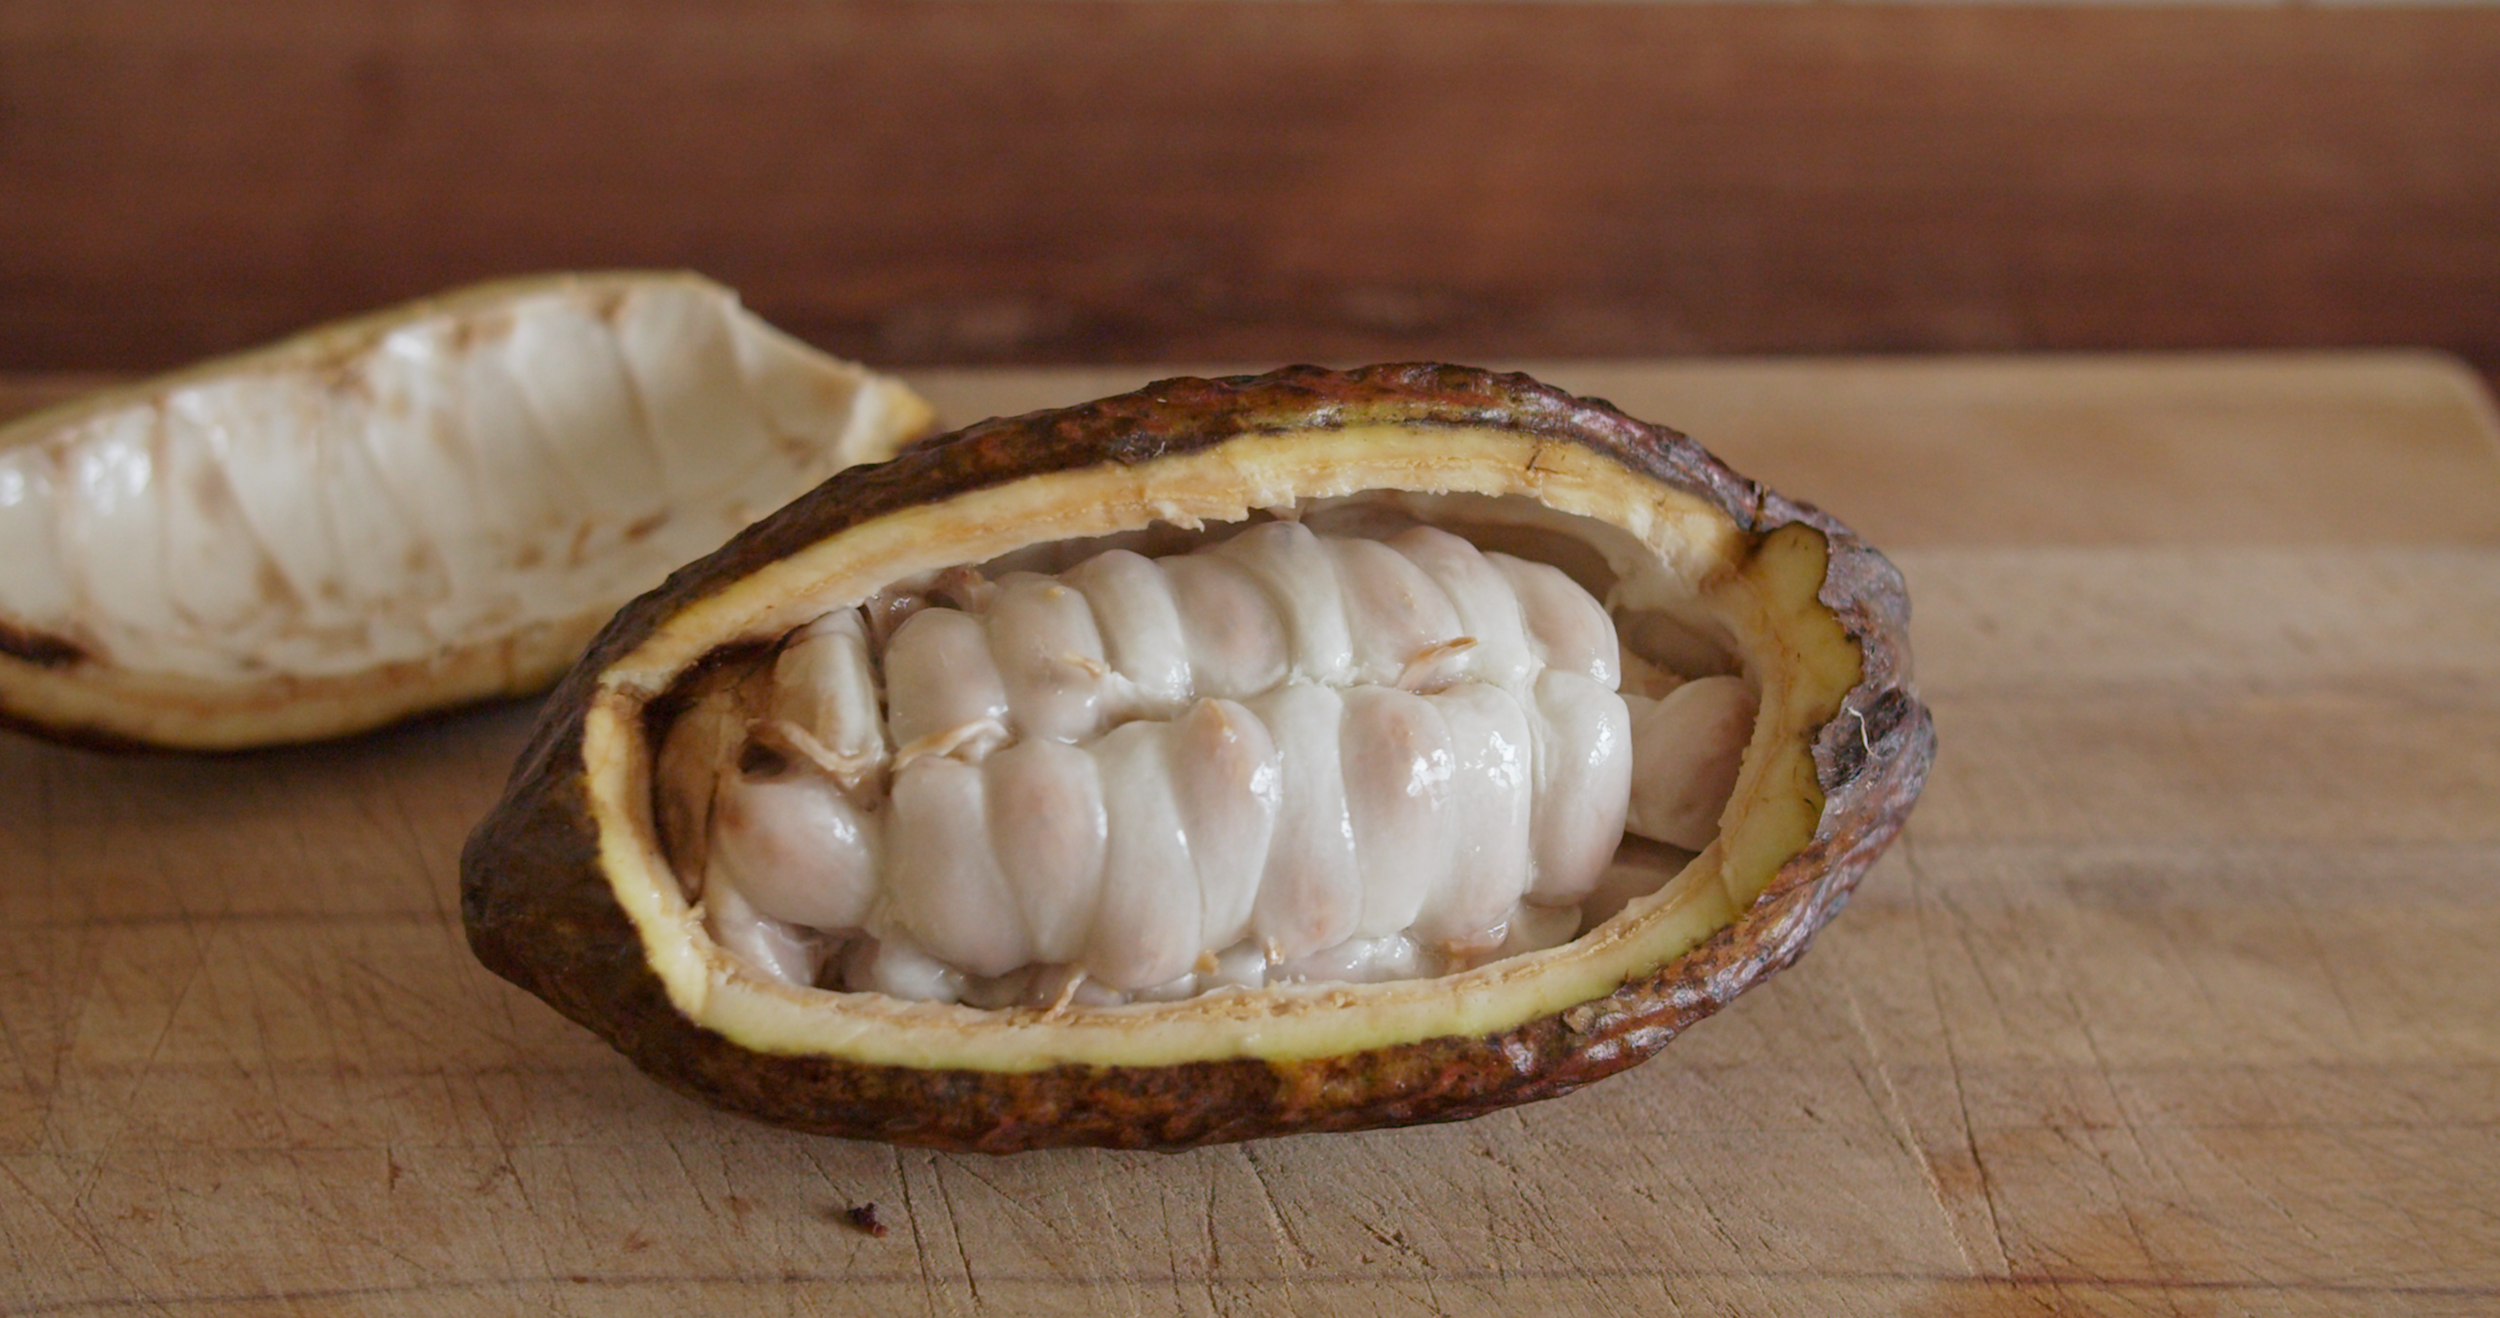
We can scoop out the beans, and you can see that each bean is surrounded by some fruity pulpy flesh. This stuff here is edible and has a very delicious almost citrusy flavor, not at all what I expected.
What we are after when we make chocolate is the interior of these seeds. If we cut one in half you can see kind of a purply bit. You can in fact eat this, it’s a little bitter, but it sorta kinda tastes like chocolate. Through the process of fermentation, drying, and roasting, we will reinforce this flavor to make what in the end is chocolate. And to wrap up, this fruity pulp is what is going to power the fermentation. I am collecting the beans from 4 pods, just scooping out the interiors and collecting them into this bowl. With our beans all scooped out, it’s time to begin the fermentation process.
The fermentation stage is extremely important in the process of making chocolate, this is the stage where a majority of the chocolate flavors and fruitiness are developed.
Now I have to admit the process of fermentation of these beans can pretty nuanced and complicated, expert chocolatiers have written a lot of stuff about how different stages of fermentation in regards to oxygen exposure of acetic acid or alcohol in terms of how much oxygen they are exposed to as well as far more complicated flavor compounds.
Now despite the website’s name, this is all beyond my paygrade, so I took a simplistic route for fermentation, and honestly, the chocolate I ended up with had an extremely complicated and fruity flavor, something similar to high-end chocolate bars or coffee. So let’s just follow my caveman attempt.
The first time I made this, I just placed the fruit into a bowl and allowed it to ferment, which turned out to be a terrible disaster, and I had to start the whole process over again.
Pull the fruit out of the pods and place it into a very well-cleaned container, preferably something like this where you can easily monitor what is going on inside. I had a little glass weight I used to weigh the beans down, but I am not entirely sure this is necessary.
Now the name of the game is to ferment this for a week.
After about 24 hours, depending on how warm it is outside, you should begin to see the effects of fermentation. The beans will start to change color, and expel a liquid. Traditionally fermentation is performed in giant wooden crates where the expelled liquid can be drained away. For this small amount of cacao beans, it didn’t seem to make a huge difference.

Once every day or so I did like to open up the container and stir it up with a clean spoon. I did this on day 1, day 3, and day 4 of fermentation. On day 4 I opened up the top of the container and covered it with a clean towel. Let this ferment open for 2-3 more days, stirring every day, until it looks like this.
At this point, we are ready to move onto the next step. Now, this stuff not only looks funky it also smells pretty funky and a little bit alcoholic, don’t worry that’s totally normal. However, under the alcoholic funkiness, it will have an ever so slight chocolatey smell.
Step 2 - Drying & Roasting
The next step is to dry these beans out completely, traditionally this is done in the sun, but the weather outside when I did this was cold and rainy, so that wasn’t an option. I placed my beans into a dehydrator and let them dehydrate for 24 hours.
After 24 hours, we can pull them out. If you peel the shell off of the beans, we can see the cacao bean inside, this is the chocolate. Now we aren’t fully there yet, because we still need to roast it, but we can see that the color is almost there, and if you smell it, it will still smell a little funky, but it does have a chocolatey smell.
At this point, we are ready to actually begin roasting the beans. There are a bunch of different methods for roasting, but again we are going to go the simplistic route.
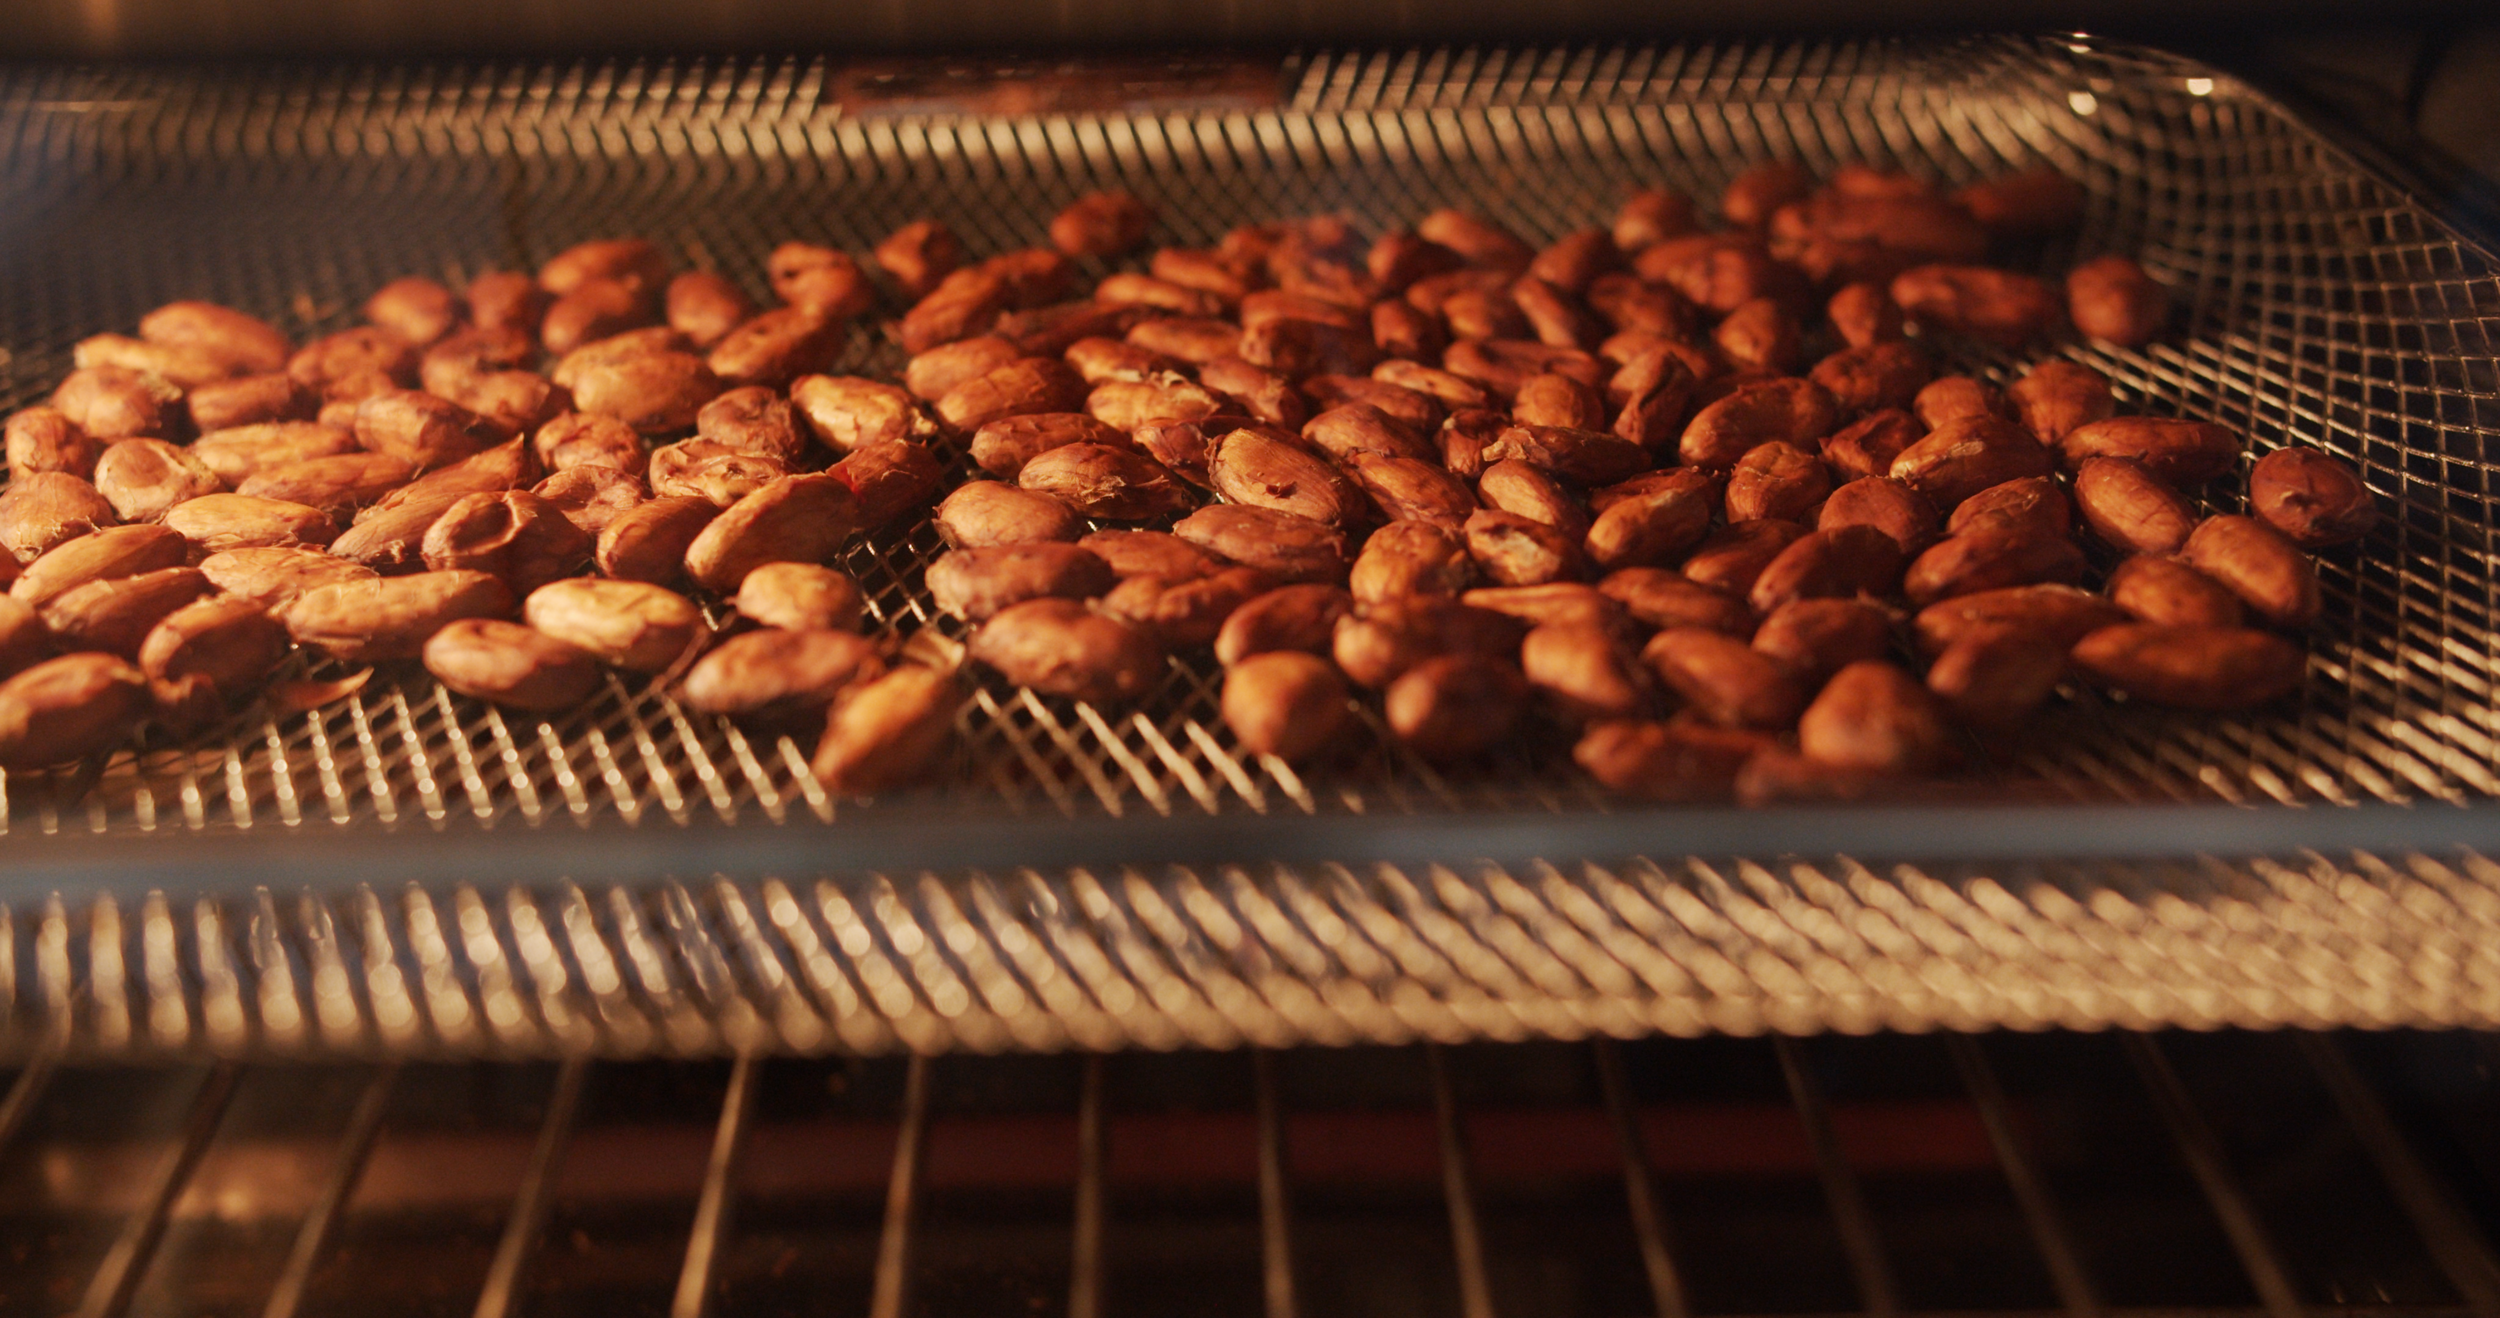
Now for this step we want to do a two-stage roast, start the oven at 325F (160 C) degrees for 5 minutes to start the roast, and then turn the temperature down to 275 F 135C for 20 minutes.
I was surprised at how much this relatively short roasting time changed the beans, this roast made my whole house smell like wonderfully warm chocolate. This is the stage where it goes from beginning kinda funky to full-on chocolatey.
Once we are done roasting, we can pull it out of the oven and let them cool completely. I let them sit for about 2 hours on the cutting board. Once they are cool it’s time to peel the shells off exposing the cacao nibs inside. It helps if you can crack them first, this process is a little time-consuming, but it’s honestly not so bad. In total to peel all of them, it took about 10 minutes.
Some small fragments of shell ended up in with the cacao nibs, you can use a hairdryer to blow them away, or I just simply picked the nibs out by eye, leaning to the side of not collecting as much chocolate, but really ensuring that there weren’t any pieces of shell leftover.
Step 3 - Grinding
Alright once all of the nibs are ready, we can move onto the next step, which is to grind them up and turn them into chocolate! But before you do, it’s not a bad idea to weigh the amount of total cacao nibs you have collected, it will help inform us of how much stuff to add to this when we make the chocolate bars later. To start off the grinding, I just used a mortar and pestle to break the cacao nibs up. I was able to get a pretty rough grind using this method.

Now to be able to get to the level of smoothness of a commercial chocolate bar, you need a special piece of equipment called a conch. These will run you about $300 so I instead experimented with grinding the cacao nibs using stuff I already had. This was an experiment, so feel free to mix and match how I did this to whatever works for you best.
Next, I poured the somewhat crushed nibs into a blender and let this go. I also took this opportunity to add a little sugar, this will balance the bitterness of the chocolate. How much you add is up to you, I am a big fan of dark chocolate so I only added 20 grams of sugar to the chocolate, which gives me about 85% dark chocolate.
The blender did produce a much finer grind, however, it was constantly getting stuck in the corners and getting kind of annoying to deal with. I decided that after I got it somewhat fine, I would try to finish it with the mortar and pestle again.
Back into the mortar and pestle, after about 10 minutes of vigorous work, I ended with as fine as I was able to get it. I know that it looks like I have big chunks, but those are actually clumps of fine powder that got compacted in the mortar and pestle.

Alright, so the cacao has some natural oil in each of the beans, this stuff is what is known as cacao butter, depending on how well we were able to grind this down, the cacao butter will express itself in the powder we have here. However, as you can see this isn’t very oily looking, so we will need to bolster this with cacao butter. To my 120 grams of cacao nibs, I am added initially 20 grams of cacao butter, (but added another 10 later).
The cacao butter will give us the chocolate bar texture, so first, we need to melt it. I just popped this into the microwave for 2 minutes, keep a close eye on it. Once melted it should look like this. Add it into our chocolate, and stir it up.
Now we are ready to begin to melt, temper, and mold the chocolate. Place the cacao over a pot of boiling water to make a double boiler. This will begin to melt everything together. Even after heating, my chocolate still looked a little dry, so I added 10 more grams of cocoa butter, which seemed to do the trick. It should almost look like a wet brownie mix.
Now while heating the chocolate we want to keep a good eye on the temperature. Now that the chocolate has melted, and it looks like a good temperature, we need to temper the chocolate. This is the process where we provide chocolate crystals within the chocolate to align, forming a uniform solid hard chocolate bar. If we do not do this step, the chocolate will come out mushy.
Now there are a million different ways to do this, some involve using a marble slab and some metal spatulas, the easiest is to use something called beta crystals, but the most practical way of doing it I find is to use a piece of dark chocolate from a chocolate bar. This will provide a seed crystal for the chocolate to form around. To do this, let the chocolate cool down, and once it reaches 91F (31C) degrees, add a piece of dark chocolate from a nice chocolate bar into the melted cacao and stir it until it’s fully melted.
Alright while this is still molten go ahead and pour this into a mold. I am using a silicone chocolate mold I got online, and it seemed to work really well. Carefully pour the chocolate in and it doesn’t hurt to give it the old tappa-tappa to coax out any air bubbles.

Once the molds are filled, it's just a matter of letting this cool down completely. For me, I left this in the fridge overnight.
The next morning I returned for the moment of truth.
Beautiful! I couldn’t be happier with my chocolate bars. How did it taste? Well as I said before it was a little grainy, but that doesn’t really bother me. The taste was fantastic, like a really high-end chocolate bar.
It was a really fun process, and even though I had some issues, it was extremely fun and gratifying to be able to make a chocolate bar all by myself.
Alright, that’s it for this week. If you have something you want me to make for you, please feel free to leave it in the comments down below!
Condensed Recipe:
Ingredients:
3-4 cocao pods
10% of the collected mass in granulated sugar
15% of the collected mass in cocao butter
I sourced my cacao pods from Miami Fruit - please help support this small business!
Enjoy!